Tuesday, May 14, 2013

PILLAR CANDLES


What you will need:
Cardboard tubes (like toilet paper, wrapping paper, paper towel tubes)
Scrap cardboard
Newspaper
Glue/Water for paper mache
Hot glue
Acrylic paint
Electric tea light candles

First you'll want to start by tracing a circle using your tubes on the scrap cardboard.  Cut this piece out and slide it into the tube and secure in place with hot glue.  Make sure to use your tea lights as a guide as to how far the cardboard circle should go in because you want the flame part to be visible.


After you do this, take a piece of newspaper and measure it to fit the tube.  I only did one layer of paper per tube.  Make sure to make it long enough to fold over the top of the tube where the cardboard circle is secured.  Also, for good measure, I stuff the tube with newspaper to make it more sturdy.  


I paper mached the tube but I did it a little different than the usual technique.  I painted on a layer of the glue and water mixture, then wrapped the paper on the tube, then did another layer of the glue and water mixture on the outside.


After the paper dries, get out your hot glue gun.  Use it to make "wax" dripping down from the top of the candle.  Simply move it from the top down the tube and decide how far you want the drips to go down.  Do this all the way around the top of the tube, or not, up to you!


Sorry the hot glue is hard to see in the picture.  As you can tell, I made several of these.  After the hot glue hardens, just paint the whole thing and let it dry.  Bam, you're done!  It's ready to have the tea light turned on  and placed inside the top of the tube.


Now, I grouped these together and hot glued them to each other.  But you could easily attach these to a candle holder.  That's what I did with this next one.  I found the candle holder at a thrift store for a $1.


Have fun!  You can make as many or as few as you want.  They're so easy and cheap.  You can get creative and add glitter or glaze or whatever your heart desires.  And with them being electric, no risk of fire!  


Monday, May 13, 2013

POTION BOTTLES


What you will need:
Empty containers
Spray paint
Glue or Mod Podge
Tea dyed paper
Pen (for writing on the labels)

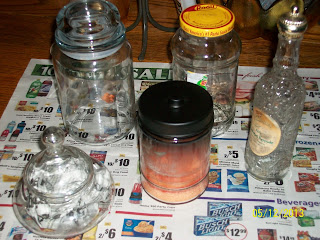
First, you'll need to gather an assortment of glass or plastic bottles/jars/containers.  I used all glass because I prefer the feel and durability of it as opposed to plastic.  A couple of these are jars I already had and a few are ones I found at a thrift store for $1 each.  


Next, grab your trusty spray paint.  This is the kind I used.  It bonds to metal, wood, wicker, glass, plastic etc...almost everything.  Plus, you only have to wait 1 minute between coats.  It dries in 10 minutes and is ok to handle within an hour.


Set up your drop cloth or trash bag or old shower curtain...whatever you want.  It's best to do your spray painting outside on a dry and hot day.  I did several thin coats of paint.  Make sure to cover every inch.


After I let these sit outside for about an hour or maybe two, can't exactly recall, I brought them inside and got ready to make the labels.


After tea dying the paper and letting it dry, I wrote out the labels and loosely cut them out.  I burned the edges for the hod podge random look.


Attach the labels to the containers with your mod podge or glue and just let them dry. 

That's all you have to do.  Get creative with your potion names!  Or, as I did mine, ingredients.  Side note: I glued the lids down using hot glue.  I didn't want mine to be able to open since they're empty.

Update: I made several more jars, including a couple apothecary jars.  For the bases I used an old door knob for one and a candle holder for the other.  Also, the large glass jar is just the way I bought it except I added a label to it saying "Poisoned Apples".  That was a thrift store find for just $4.


Sunday, May 12, 2013

WITCH'S SHOES


These fun and charming witch's shoes can be used as candy dishes with wrapped candy or as display items.  I'm going to use mine as part of a witch's station I'm setting up in October.

What you will need:
A pair (or a single) of heels
Hot glue
Masking tape
Aluminum foil
Scrap cardboard
Paint (your choice)
Newspaper strips
Glue/Water
Painter's Glaze or Mod Podge (optional)
Bobbles/Glitter/Decorating things

I started with a pair of heels I already owned and was positive I would never wear again.  They were wickedly uncomfortable!


I started out by forming some pieces of aluminum foil into curled points to make the toes of the shoes.  After doing this, I attached them with masking tape.


After doing this to both shoes, I wrapped the whole front end of the shoe in masking tape, making sure the cover all the way up the strap.


I then cut two small circles out of cardboard from an empty pasta box.  I hot glued them onto the heels of the shoes so I could widen them.


Then came the wrapping with foil for structure then wrapping them in masking tape to hold it on and give it some more support.


I stuffed the toes of the shoe with newspaper to give it some support and also to fill it in.  


I decided that my shoes looked too plain on the front, so I decided to add a little flare by giving my pair of shoes a pair of tongues.


Then it's time to paper mache.  Paper mache every single inch of the shoe.  Make sure to cover the inside as well and make sure to cover the opening.  This is how you make sure that the shoes' pasts are gone and covered up for good.


Once they dry (which will take several hours), it's pretty much whatever you want to do after that.  I glazed mine once the paper was dry for added durability but you can easily skip that step.  Just do whatever your heart desires.  Paint them pink or green or blue.  Just have fun!  I'm traditional so I painted mine black and covered them with green glitter glue.  


GOOD LUCK!


Sunday, May 5, 2013

THE HANDBOOK FOR THE RECENTLY DECEASED


I started out with just a plain Whitman's Sampler box exactly like this one in the picture.

(photo courtesy of CVS via Google)

After taking a good look at the box, I decided to get out a few tools I would need.
Burgundy, black, and yellow paint (I was out of brown so I had to make it)
Glaze (or you could use mod podge or your homemade mod podge)
Fabric (I used an old t-shirt)
Brown Sharpie
Elmer's Glue
Scissors
Masking Tape
X Acto Blade Knife

I started by taking the top off the box and wrapping three sides in masking tape.  I was so delighted to see that the masking tape gave it look of pages, so that's all I had to do with that.

After wrapping the sides, I put the box back together.  I took some scrap cardboard and cut and measured it to fit one side of the book to create the binding.  Now, if you have the box then you know it came with a little white liner in there.  Use that as well as padding behind the cardboard piece.  I suggest hot gluing the piece to the "naked" side of the box (in other words, the side of the box without masking tape).  Tape the top and bottom to the binding piece using the masking tape.


Here you can see how I did that.  Sorry I don't have any actual pictures of that process.  

I wanted the box to able to actually open for the cover, I after creating the binding, I took my knife and cut the cover away from the inside of the box.


This was taken after I took the inside of the box and covered it in the fabric.  I simply then cut the pieces to fit the bottom and each side of the box.  Then I adhered it using the Elmer's glue.  Let it dry fully before you try to mess with the inside anymore.

While I waited for that to dry, I started to paint the outside.  Good thing acrylic doesn't take that long to dry, especially if you're as impatient as I am.

After the brown was dry, I did a Google image search for The Handbook for the Recently Deceased.  Make sure to find a large picture so you can see the details.  Now, if you can think of an easier way to do the cover art, then by all means do so.  I tested my talents and did the lettering and image of the people by hand using the assorted acrylic paints I already had.


Of course it's not an exact replica, but hey, close enough...right?

As an added touch, I used a brown Sharpie on a piece of scrap paper and did the "The Handbook for the Recently Deceased Press" label for the inside of the cover.

If you're wondering about the round pieces under the fabric used on the inside of the cover...they are pennies.  I glued them into place and then put the fabric over them using more glue.  After that was dry, I taped the edges down and painted those brown as well.  The pennies are to add weight to the lid and keep it closed.

After all the paint was dry, I covered the whole thing in glaze to protect it.  As some of you may know, acrylic paint can be delicate.  The glaze protects it and prevents chipping and scratches.  For a little extra stability, I attached a few felt circles to the bottom of the box.  This keeps it from directly touching whatever surface it sits on and keeps it from getting damaged on the bottom.

Here is the finished product.

I hope this helps you out.  If you don't like any method I used, then get creative and make it better!